
Proper waterproofing of wet areas in your bathroom is critical, in particular if you live in a strata property. If water leaks from your home into your neighbour’s unit below, it can cause water damage and you would have to pay for the repairs. Waterproofing systems typically carry a five-year warranty, after which they need to be examined and restored.

Bathrooms have been identified as the area most susceptible to leaking in stratified residential buildings in Malaysia. According to a study, “Identification of leakage syndrome toward the sustainability of residential buildings in Malaysia” by Ishak et al, there are many possible causes of leakages in bathrooms, including degradation of pipes, aged waterproofing material, cracks in external walls and concrete failure.
Waterproofing is important to prevent leakages, seepages and damage, especially in strata buildings where inter-floor leakages can cause you to suffer significant losses in repairs to your neighbour’s unit below.
For new residential projects, waterproofing systems for internal wet areas typically carry a five-year warranty. After this period, due to wear and tear, the systems need to be restored to maintain the water tightness of the floor slabs. The most common types of waterproofing systems or membranes in Malaysia are cementitious waterproofing, polyurethane waterproof coating, acrylic, epoxy, bituminous waterproofing and rubberised waterproofing compounds.
Did you know that waterproofing technology is not taught in the professional training of surveyors, architects and engineers? Unlike some developed countries, there is no requirement for surveyors, architects and engineers in Malaysia to take additional papers in waterproofing. Instead, these professionals rely heavily on the advice of manufacturers.
Application of waterproofing membrane in bathrooms
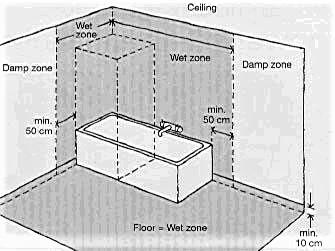
A waterproofing membrane must be applied on the low slope floor with an upturn of 300mm on the walls to form a “bowl” shape. In shower cubicles and other areas where water may splash from the shower hose, an upturn of 1800mm is applied vertically on the walls within 1500mm from the shower hose. There must be 2 layers of waterproofing on the floor and the membrane must also have angle fillets of 25mm X 25mm to prevent cracking at the floor edges. Lastly, it must be extended into the waste pipes (except for water closets) by 50mm and the door by 300mm (refer to the image below).
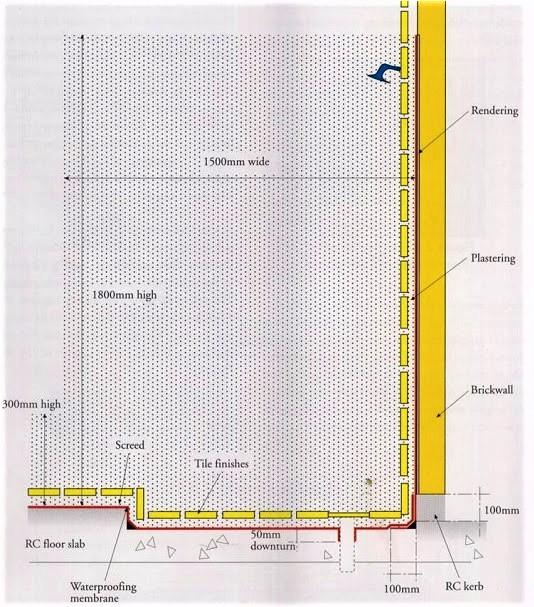
Source: Good industry practices in internal waterproofing, Building and Construction Authority, Singapore
What happens to your waterproofing membrane when water drainage is not constructed properly?
Note that cast-in-place (or poured-in-place) concrete may not produce the low slope required for effective drainage of water and pollutants that can seep through the cement screed (the top layer to finish floors). In some cases, uneven floor surfaces may cause unseen water puddles to form on top of the waterproofing membrane. Bleach in detergents may cause acid to accumulate in these hidden water puddles, as acid is 10% to 20% heavier than water.
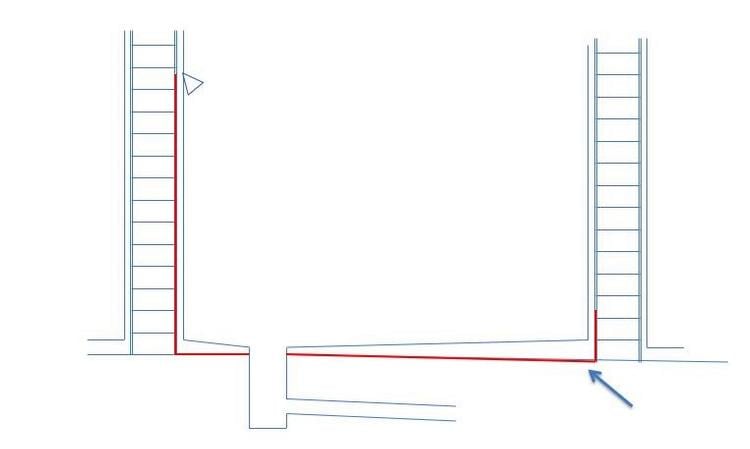
During construction stage, the floor was not made to fall correctly to the floor trap. When water seeps through the cement grout, it will dissolve the calcium in the cement and become alkaline in nature. If the dissolved Calcium is not drained away, and accumulate at the wall edges due to the wrong gradient, the alkalinity will increase and become very corrosive. This would damage the existing waterproofing membranes.
Refer to Steps to restore the waterproofing in a bathroom below.
SEE WHAT OTHERS ARE READING:
 House waterproofing: Materials used and the costs involved
 Water leakage in flat roofs – What is the cause and how to prevent it?
Key performance criteria for durable waterproofing
- Flexural fatigue resistance of the membrane to elongate and return to the original length when pulled.
- Chemical resistance according to AS3740-2004. Able to resist chemicals from the use of bleach or detergent in routine cleaning.
- The membrane must sit on low slope surfaces to avoid cumulative acidity and contaminants on the surfaces.
I once performed a bleach immersion test with different waterproofing products and the results showed most of the waterproofing materials succumbed to chemical reactions brought about by an accumulation of bleach (shown below).
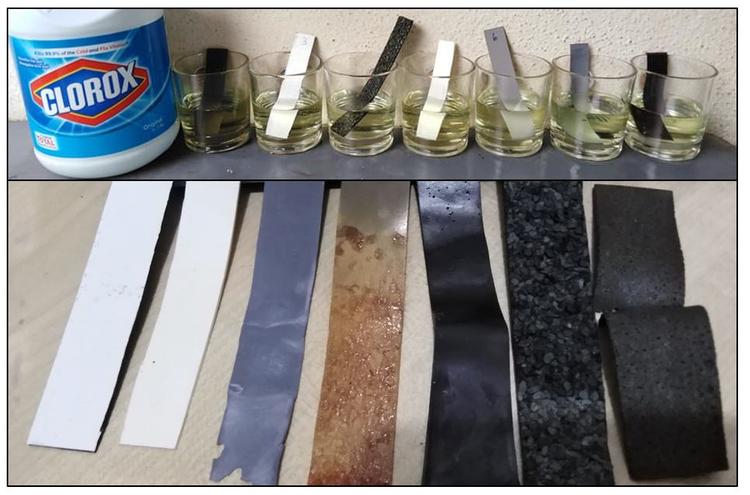
I encourage building managers to carry out this simple test when selecting waterproofing products.
Measures to improve waterproofing systems in your house
Some of the measures you can take to improve waterproofing include hydrophobic impregnation, impregnation and surface coating. However, they offer little warranty and work differently in protecting concrete against water penetration and Carbon Dioxide infiltration which leads to corrosion of reinforcement steel bars and disintegration of concrete.
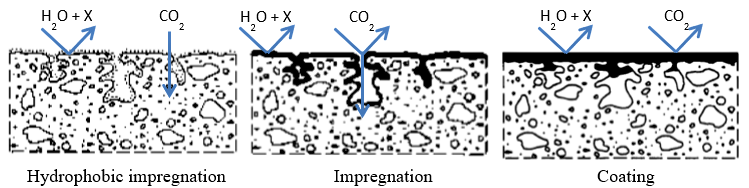
Source: Sistemas de Protección Superficial para el hormigón
Hydrophobic impregnator refers to water repellent which repels water but does not block the penetration of CO2. A crack movement of 0.1mm to 0.2mm or more would render the repellent unable to prevent water from entering the crack.
Impregnation aims to seal the pores and block aquatic contaminants. However, its effectiveness in blocking CO2 is limited. Moreover, it does not have the elasticity to handle movements in buildings.
Impermeable surface coating such as epoxy coating can be applied on existing floor surfaces without hacking. It can seal cracks and withstand foot traffic due to its mechanical strength. However, epoxy lacks the elasticity required to handle movements in buildings which is critical for durability.
Recommended waterproofing system to use in toilets
The most common type of waterproofing system is cementitious waterproofing compound which only needs one coating and is fast drying. However, this waterproofing system fails in many areas. Due to its latex and cement content, it cannot take any corrosion and most importantly, it has no elasticity.
Personally, a water based hybrid of bitumen and polyurethane with high resistance to chemicals and possessing great elasticity is the best waterproofing compound I have come across so far. High elasticity is important as this. High elasticity is very important because buildings are set naturally to the ground. Cracked lines from the earth settlement can break waterproofing membranes that are rigid. A waterproofing system with high elasticity enables it to bond strongly to the floor and wall surfaces, thus bridging cracks.
MORE: Green buildings in Malaysia: Everything you need to know
How to detect waterproofing failure in your home
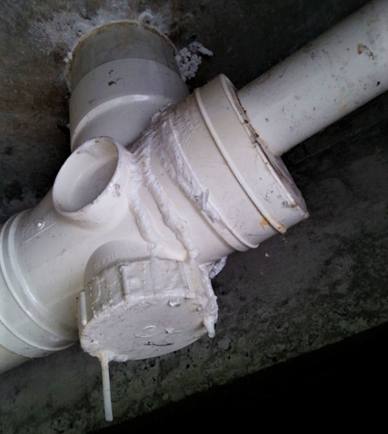
A typical sign of waterproofing failure is efflorescence i.e., the presence of soluble mineral deposits on the concrete. Unlike domestic pipes that have water running through them 24/7, efflorescence occurs in failed waterproofing due to a cycle of wetting and drying that allows dissolved minerals sufficient time to solidify and crystallise before getting washed away by the next water infiltration.
Waterproofing failure can be verified using a flood test known as “ASTM D5957 – 98(2013) Standard Guide for Flood Testing Horizontal Waterproofing Installations”, a moisture meter and at least 24 hours of regular monitoring. A common mistake in conducting flood tests is using a flat plastic sheet to seal the floor traps. Water can seep out of the porous cement screed and no hydrostatic pressure can build up for correct testing. Instead, insert a temporary blockage into the waste pipe and remove it upon completion of the test to prevent the creation of a new blockage.
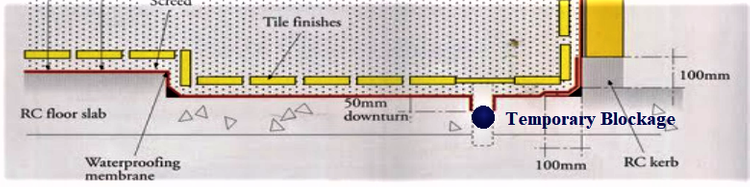
Source: Good industry practices in internal waterproofing, Building and Construction Authority, Singapore
Steps to restore the waterproofing in a bathroom:
STEP 1: Check for spalling under the concrete floor. If visible, it is recommended that you conduct a Phenolphthalein test to assess the level of carbonation and further testing and concrete repair based on BS EN1504.
STEP 2: If there is no spalling, proceed to dismantle bathroom fittings and hack tiles and cement screed to expose the concrete floor slab and brick walls.
STEP 3: Repair cracks in the floor and wall, if any
STEP 4: Replace pipes and other utilities if the service lifespan has expired
STEP 5: Patch holes and uneven surfaces on the wall
STEP 6: Cement screed to fall on the concrete floor and allow sufficient curing
STEP 7: Construct angle fillets of 25mm X 25mm along all edges on the floor and walls
STEP 8: Apply waterproofing compound with high flexural fatigue resistance and chemical resistance with an upturn of 300mm on the walls and 1800mm in the shower cubicle according to the manufacturer’s specifications
STEP 9: Flood test for 24 hours
STEP 10: If flood test is successful, proceed to cement screed to fall and allow for sufficient drying
STEP 11: Install new tiles and restore bathroom fittings
Take note of dampness when re-waterproofing
When dampness penetrates concretes and reaches reinforcement steel bars (rebars), it causes the rebars to undergo oxidation and de-alkalisation with a drop in the pH level of the concrete. When the pH level drops from 12 or 13 to 9, the hydroxyl film that protects against corrosion breaks down and corrosion starts. With an increase in oxidation, the corroded rebar expands progressively to up to 6.5 times its original volume. This causes expansive pressure from within that disintegrates the concrete.
A re-waterproofing work done without addressing corrosion and de-alkalisation of concrete will not be durable. The corrosion of rebars does not stop when the concrete dries up. Instead, it merely slows down and will eventually cause cracks in the concrete and the new waterproofing membranes. The Ministry of Housing and Local Government (KPKT) recommends the internationally recognised EN1504 standard for diagnosis and repair of concrete which I will discuss in-depth in my next article.
NOTE: No literature or standards for waterproofing wet areas can be found in North America, Britain and Europe either. In Australia, there is a standard called “AS3740-2004 Waterproofing of wet areas within residential buildings”. Singapore has its own version called “SS 637:2018 Code of Practice for waterproofing in reinforced concrete buildings”, on top of Good Industry Practices in Internal Waterproofing guide published by the Building and Construction Authority (BCA) for contractors, professionals and building owners.
If you enjoyed this guide, read this next: Condo vs Serviced Apartment in Malaysia – Which one is better?